Mini-breeding of silkworms every year
from may to november
At the foot of the Tour Rose, in the heart of Old Lyon, Brochier Soieries presents, during the mulberry season, from MAY to NOVEMBER, depending on the availability of mulberry leaves, a small silkworm farm.

Come and discover the complete cycle of the silkworm from the hatching of the caterpillars to the spinning of their the cocoons and the comming up of the moths, all through the 5 ages of the silkworm.
Free visit during shop opening hours:
7/7: 10:30 a.m.-1 p.m., 3 p.m.-6 p.m.
Free guided tour for groups of
max 15 pax by appointment only.

You want to do your own breeding in class or at home,
we give you eggs!
Some tips first of all
According to our observations in our small breeding that we have been doing at the shop for demonstration since 2014 here are some benchmarks below.
The sine qua non condition is to be able to obtain fresh mulberry leaves (not the blackberry bush).
- We do not sell caterpillars,
nor cocoons, nor breeding boxes.
1. COLLECTION AND STORAGE OF LEAVES
- The leaves should not be wet. If you pick the leaves wet from the rain, do not let them dry in the open air (they may start to wither), whipe them with paper towel before putting them in the fridge.
Sometimes the leaves can be contaminated by pesticides from treatments carried out around the mulberry trees (Fenoxycarb on apple orchards for example). In this case, wash the leaves in cold water and pat them dry before putting them in the fridge or feeding the caterpillars.
You can pick the leaves 2 to 3 times a week and keep them in the fridge without packing them down, without tearing them, one on top of the other in a plastic bag, preferably perforated. Avoid contact with the back wall of the fridge which can freeze them,
if this happens, the leaves will turn black.

2. HATCHING
- The eggs hatch at room temperature (20°C min) after 10 to 20 days of incubation, sometimes even before
(depending on the temperature and humidity of the environment)
You can wait the day after hatching to start feeding the hatchlings. Place your breeding in a well ventilated place in the shade. For 50 adult worms, a 20/30cm box is sufficient, preferably in transparent Tupperware type plastic box with a pierced or half-opened lid to keep the leaf fresh as long as possible, so the baby worms can eat it well before it dries. You can raise them in the same box until the cocoons are spun.

3. First age
- You need fresh, tender leaves, especially for the 1st week.
Renew as soon as they dry (the edges bend), a small leaf in the morning, one in the evening would be sufficient for newborns if it is not too hot and the sheet does not dry too quickly. Adjust the leaf size to the area occupied by caterpillars, no need to waste leaves.
- The 1st and 2nd weeks cut a leaf no larger than the palm of your hand with clean, dry scissors into strips (I make fringes keeping a big rib, the worms climb on the fresh leaf and I can move them easily to remove the dry leaves once every 2 days.
4. MEALS
- From the 2nd week, three meals a day are essential for the good development of the caterpillars, morning, noon and evening, 7 days a week, always fresh and tender leaves.
From the 3rd week you can no longer put a lid on the box, they eat fast enough so that the leaves do not have time to dry out.
But watch out for wasps and mice! Wasps sting caterpillars and eat butterflies, mice eat butterflies and eggs and can shred worms. The ideal, if you know that there may be rodents in your breeding room, is to protect the top of the box with an anti-rodent mesh and the cocoons with a perforated metal basket.
5. CLEANING
- Clean at least twice a week, depending on the amount of excrement.
The quantity of leaves depends on the caterpillars' age and therefore the their appetite. The more they grow, the more they will have an appetite and the more excrements they will eliminate.
To remove excrements ans dry leaves, wash your hands well before moving the caterpillars by hand, one by one. Use a thin paintbrush for the little ones and clean blunt tweezers for the big ones. Be as clean as possible on hands, instruments and container, Bombyx caterpillars are very sensitive.
6. THE 4 MOULTS
- The development of a Bombyx caterpillar is punctuated by 4 moults (skin changes) which delimit
5 ages. In general, the moults take place on the 4th, 11th, 17th and 25th day.
The caterpillars stop eating, attach themselves to the litter using a few silk threads and stop moving with their heads raised. Then the old skin splits on the back of the head and by dint of contortions the caterpillar leaves its old envelope and resumes its development. During the moults it is advisable not to feed the caterpillars, but generally they do not all moult at the same time, so for me it is better to feed anyway with a very small amount of leaves for the latecomers.
7. SPINNING THE COCOON
- From the baby to the adult ready to spin its cocoon, it takes 4 to 5 weeks, depending on the subspecies (in our breeding there are quite varied mixtures, moreover you can also have different colors of cocoons, from white to salmon orange).
You can leave it in the box or, better, make a "hedgehog" with skewers in a polystyrene plate or foam, spaced 2cm apart and put the worms one by one on the skewers as soon as they no longer eat, become translucent and begin to climb the walls of the box to drool their yarn.
8. METAMORPHOSIS
- Once the cocoon is finished, the metamorphosis lasts between
10 and 15 days.
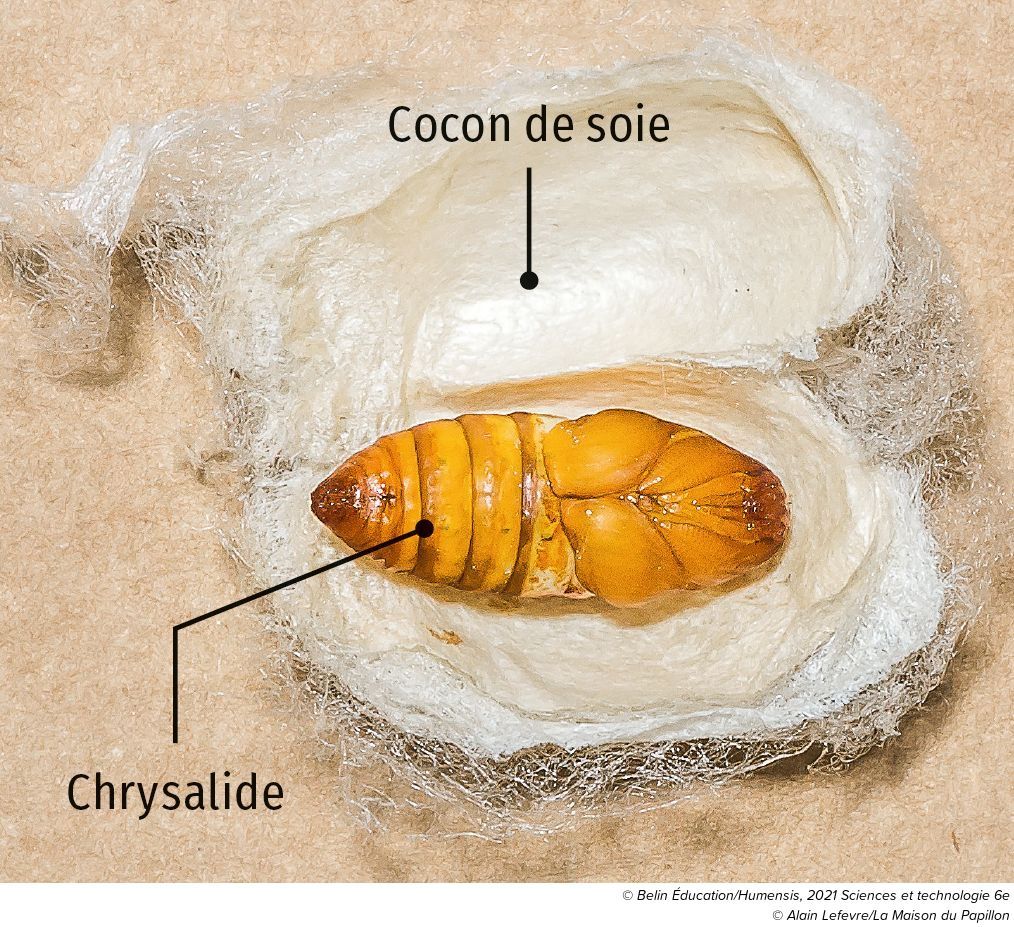
During these 2 weeks the caterpillar having drooled all its thread, locked inside the cocoon, turns into a brown chrysalis (pupa) to become a moth (night butterfly). When the moth is ready to come out it breaks the brown skin of the chrysalis, produces an enzyme which softens the wall of the cocoon to make a hole in it in order to come out.
To see a chrysalis, you can take it out of its cocoon, 4-5 days after the start of spinning, by gently cutting with sharp scissors a slit along the cocoon, being careful not to hurt the pupa. It will continue its transformation into a moth even outside its cocoon.
9. MOTHS
- When the mots come out between
6am and 9am, they mate immediately for several hours.
Then they separate and the female lays between 500 and 600 yellow eggs which turn brown after 3 days, if they have been fertilized. You can let the female moths lay their eggs directly on the cocoons or,
for more education, you can either set up a special box for mating and laying with a paper towel at the bottom, or separate each couple on a piece of paper and under a transparent plastic cup (Louis Pasteur method selecting healthy eggs).
10. EGGS CONSERVATION
- You can keep the eggs for the following year at room temperature until the end of November, then put them in the fridge, ideally at a constant temperature of 4°C, until the following spring.
Practical ideas!
- A week after the beginning of spinning, put a few cocoons in the freezer for two nights, take them out and let them air dry for 2-3 days, so you have unwindable cocoons. Immerse 2 or 3 cocoons completely in boiling water for 30min (put them in a tea ball for example), then, while leaving them in the water, brush them with a toothbrush to start pulling threads. You pull until you get a single thread from each cocoon, regular and continuous. Roll them up on a winder and go for one km on average. You can make raw silk thread bracelets out of it!
- Mulberry leaves contain a lot of nitrogen, by eating them the Bombyx caterpillars transform this nitrogen into a chain of amino acids, that is to say into a protein (fibroin) which forms the silk thread, 10 times stronger than a steel thread to equal diameter. Some of this nitrogen remains in their droppings, however, which can make great fertilizer for your planters!


